Ultimate Guide to Filling Out the UC Application 2025-2026
目录
University of California
Applying to the University of California (UC) system can feel overwhelming, especially given its unique application format, multiple campus choices, and in-depth Personal Insight Questions (PIQs). This guide walks you through each stage of the UC application with precision—right down to which buttons to click—so you don’t miss anything. This article is based on the latest 2025–2026 UC admissions cycle.
Create Your UC Application Account

1. Visit the UC Application Website
Open your browser and go to https://apply.universityofcalifornia.edu.
On the homepage, locate and click the “Create an Account” button, displayed prominently near the center of the page.
If you already created the account, click on the button “Sign in” at the right corner of home page.

2. Create your account
- Fill in Your Email Address
- In the first field labeled “Email address*”, enter a personal email you check regularly.
- Avoid using a school-issued email address (like your high school email) to ensure you don’t miss important updates.
- Confirm Your Email Address
- In the next field “Confirm email address*”, retype the same email address exactly as above.
- This helps ensure there are no typos that might block you from account activation.
- Create a Password
- In the field labeled “Password*”, create a secure password.
- Your password must:
- Be 8 to 30 characters long
- Include at least 3 of the following:
- A lowercase letter (a–z)
- An uppercase letter (A–Z)
- A number (0–9)
- A special character (e.g., !@#%)
- 💡 Tip: Click “Show password” on the right to double-check what you’ve typed.
- Agree to the Terms
- Check the small checkbox to confirm:
- You agree to the Terms of Use
- You understand the Privacy Policy related to your data use
- ⚠️ You won’t be able to proceed unless this box is checked.
- Check the small checkbox to confirm:
- Final Step – Click “Create account”
- Once all fields are completed correctly, click the blue button labeled “Create account” at the bottom.
- You will then be taken to the next stage, where you begin your application.
3. Verify Your Account
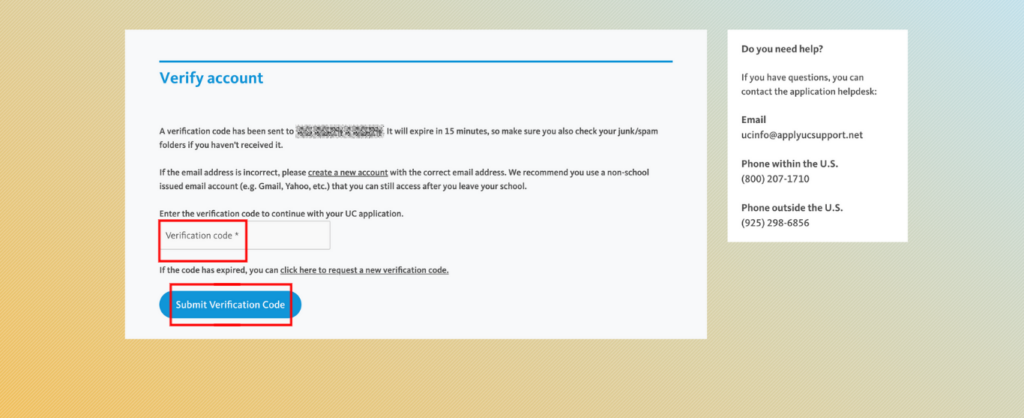
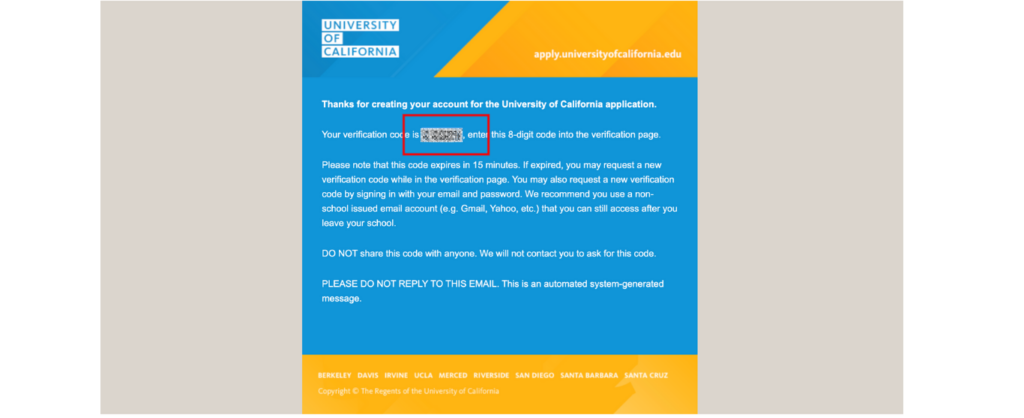
- Check Your Email Inbox
A verification code has been sent to the email address you just used to register.
The code is valid for 15 minutes only.
Make sure to check your Spam/Junk folder if it doesn’t appear in your inbox.
- Enter Your Verification Code
In the input box labeled “Verification code*”, type the 6-digit code you received.
This step confirms that your email is valid and allows you to continue your application.
- If You Didn’t Receive the Code
Double-check that your email address was entered correctly.
If needed, click “click here to request a new verification code” below the input field.
If your original email address is incorrect, you’ll need to create a new account using the correct one.
- Click “Submit Verification Code”
Once you’ve entered the correct code, click the blue button labeled “Submit Verification Code”.
You will then be directed to begin the UC application form itself.
4. Select Application Term and Level
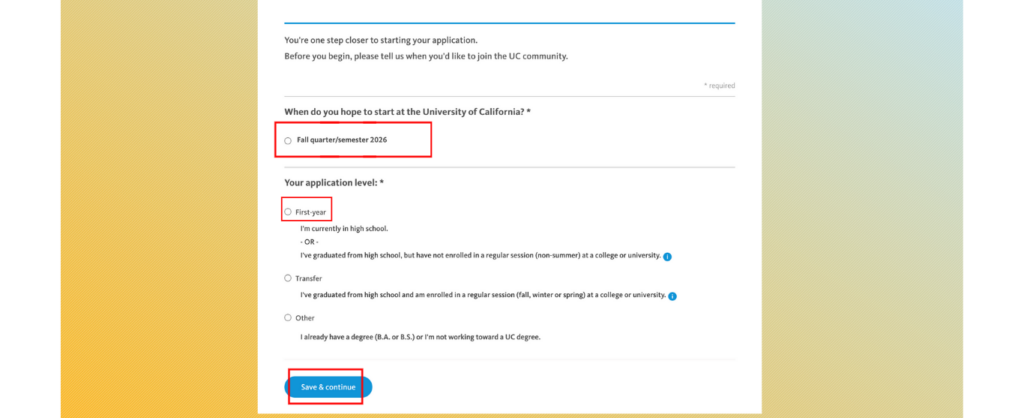
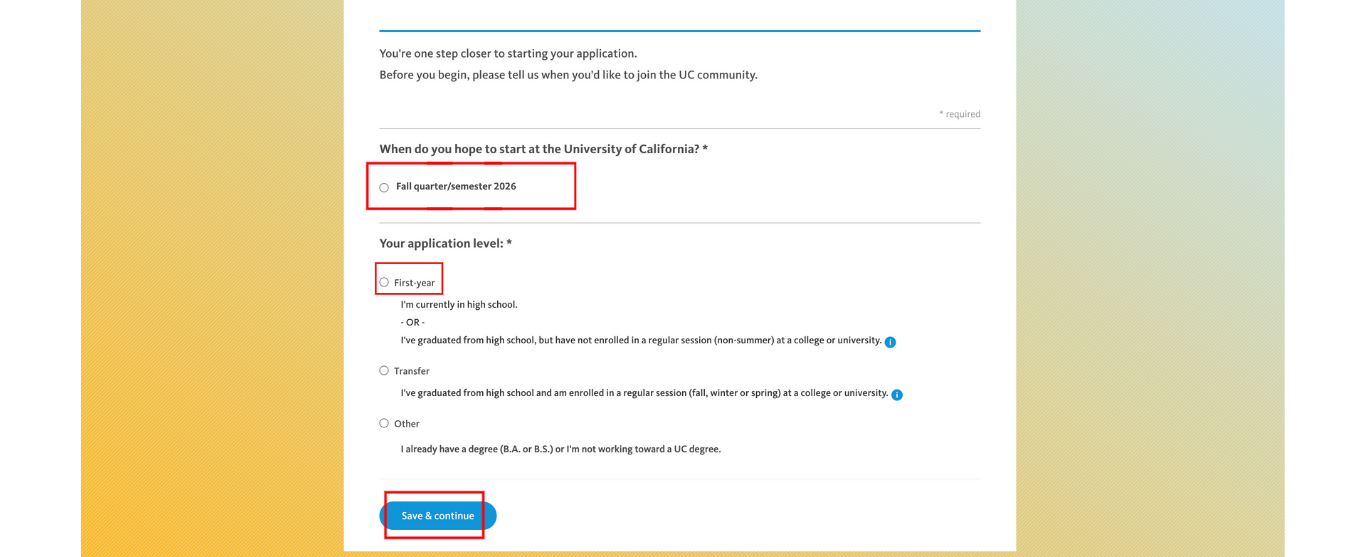
- When Do You Hope to Start at the University of California?
Choose “Fall Quarter/Semester 2026” from the dropdown.
This indicates you’re applying for admission starting in Fall 2026, which is the most common entry term for high school seniors.
Make sure this matches your intended timeline. If you’re unsure, check with your counselor.
- Select Your Application Level
First-year
Select this if:
You’re currently a high school student.
OR you’ve graduated high school but haven’t taken any full-term (non-summer) college or university classes.
Transfer
Select this if:
You’ve already graduated from high school AND
You’re currently enrolled in or have completed a regular (fall, winter, or spring) term at a college or university.
Other
Select this only if:
You already hold a B.A. or B.S. degree, or
You are not working toward a UC degree.
- Click “Save & Continue”
After making your selections, scroll to the bottom.
Click the blue “Save & Continue” button to proceed to the next section of the UC Application.
Welcome to Your UC Application Dashboard
Enter the Application Portal
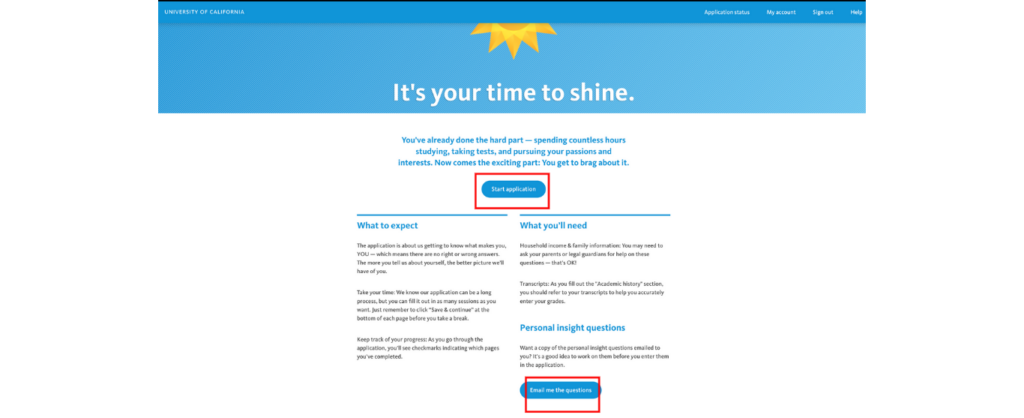
After selecting your application term and application level, you will arrive at the UC application welcome screen. This page introduces the purpose and structure of the application and outlines the information you’ll need to proceed.
- Click “Start Application”
- Click the blue button labeled “Start application” in the center of the screen to begin the official application process.
- What to Expect
- The UC application is designed to help admissions officers understand who you are—not just your academic record, but your personal background and experiences. There are no right or wrong answers, especially in the personal sections. You may complete the application in multiple sessions. Always remember to click “Save & Continue” at the bottom of each section before exiting.
- As you progress, you will see checkmarks indicating which sections are complete.
- What You’ll Need
- Before beginning the full application, make sure you have the following information ready:
- Household income and family details (You may need to consult your parents or legal guardians)
Official high school transcripts (These will help you accurately input your academic history)
A list of your extracurricular activities, awards, honors, and work experiences
- Having these materials on hand will ensure accurate and efficient data entry throughout the application.
- Personal Insight Questions
- Later in the application, you will be required to answer four out of eight personal insight questions. Each response may be up to 350 words. You are encouraged to start thinking about your responses early.
- If you’d like a copy of the questions emailed to you for reference, click the button labeled “Email me the questions.”
- Once you’re ready, click “Start application” to continue to the next step.
UC Application - About You

1. Personal Information
This section collects your legal identity, date and place of birth, and educational background in California.
Enter Your Legal Name
First/Given Name and Last/Family Name are required fields.
Middle Name and Suffix (e.g., Jr., III) are optional.
Ensure the name matches your government-issued ID or transcripts exactly.
Answer: Do you have a lived name?
A lived name is a name you use that is different from your legal name (e.g., a name reflecting gender identity).
If “Yes”, you will be prompted to enter that lived name.
UC will use your lived name in communications unless legally required otherwise.

Answer: Have you ever had a different legal name?
This applies to previous legal names, such as maiden names or court-ordered name changes.
This helps UC match your past records with your current application.
Enter Your Birthdate
Provide your month, day, and year of birth from the dropdown menus.
Ensure this matches official documents like your passport or transcript.
Provide Your Place of Birth
Enter your country, state, and city of birth.
This information is used for record-keeping and demographic context.

Answer: Have you ever attended a California public school?
Select “Yes” if you’ve enrolled in any California K–12 public school.
If “Yes”, you may be asked to provide your CA SSID Number:
This is a 10-digit number found on your high school transcript.
If you don’t know it, contact your school counselor.
Authorization for CCGI (California College Guidance Initiative)
You can check the box to allow UC to share your SSID with CCGI for tracking application status.
This is optional but recommended if your school uses CCGI for transcript services.
Click “Save & Continue”
Always click this blue button at the bottom to save your progress before moving on.

2. Contact Information
This section collects your permanent address and phone number for official communication from the University of California. Make sure the information you enter is up to date and accessible throughout the admission cycle.
What is your home address?
In the “Country” dropdown, select your country of residence.
In “Address line 1,” input your house number and street name (e.g., 1234 Main Street).
“Address line 2” is optional — use it for apartment, suite, unit, or floor details.
Enter your city in the “City” field.
Choose your state from the “State” dropdown menu.
Type your ZIP code in the “ZIP code” field.
Double-check for typos as this will be the mailing address UC uses.

What is your phone number?
If you’re using an international number, first check the box labeled “I have an international phone number.”
Enter your phone number and select the type: Home/Other or Cell/Mobile.
This number may be used for any follow-up regarding your application.
Do you have an alternative phone number?
If yes, you’ll be asked to provide a secondary contact number.
If no, simply select “No” and proceed.
Can we share your contact information with UC campuses and programs?
This is optional.
If you check this box, UC campuses (even ones you did not apply to) may contact you with:
Admissions tips and reminders
Outreach program information
Other updates before and after you submit your application
Before moving on:
Review all fields carefully.
Click the blue “Save & continue” button at the bottom to proceed to the next section.

3. Citizenship & Residency
This section is used to determine your eligibility for in-state tuition and financial aid programs like FAFSA or the California Dream Act. Be sure to answer truthfully, as this data may be shared with government aid offices.
What is your country of citizenship?
From the dropdown list, select the country where you hold citizenship.
If you are a dual citizen, choose the country that will most closely align with your residency and educational documentation.
Do you have a U.S. Social Security number or Individual Taxpayer Identification Number (ITIN)?
If you plan to apply for financial aid (FAFSA or CA Dream Act), this number helps UC match your financial aid forms with your application.
If you have a valid Social Security number or ITIN, click Yes and a new field will appear.
Enter your number carefully. UC uses this to verify your FAFSA or Dream Act application.
If you do not have a Social Security number or ITIN:
Select No. You are not required to enter anything, and this will not affect your application status.
You can still proceed with the application and financial aid through alternative methods if applicable.
When you’re done:
Double-check that your citizenship and Social Security information is correct.
Click the blue “Save & continue” button at the bottom to move to the next section.


4. Demographics
Filling out the Demographics section does not affect your chances of admission. The University of California collects this information for statistical purposes only. This section is optional, and you can choose to leave it blank. To mark the section complete, simply scroll down and click “Save & Continue.”
• Ethnicity / Ancestry
Question: Do you consider yourself Hispanic or Latino?
This refers to individuals of Cuban, Mexican, Puerto Rican, South or Central American, or other Spanish culture or origin.Select “Yes” if any of these descriptions apply to you.
If you select “Yes,” you will be asked to specify from the following:
Cuban / Cuban American
Mexican / Mexican American / Chicano
Latin American / Latino
Puerto Rican
Other Hispanic, Latin American or of Spanish origin
Select “No” if none of these descriptions apply to you.
Question: Which of the following groups best describes your racial background?
You may select all that apply. This is for statistical data collection only.American Indian / Alaska Native
If you identify as American Indian or Alaska Native, you’ll be asked to select your affiliation.


• Asian / Asian American
Select all ethnicities that apply.
Tips:
You may check multiple boxes if you identify with more than one subgroup.
If your ethnicity isn’t listed, choose “Other Asian” and specify in the space provided (if prompted).
• Pacific Islander
Select all identities that apply.
Notes:
This section recognizes the diversity within Pacific communities.
“Other Pacific Islander” can be selected if your origin isn’t listed.
• Southwest Asian and North African (SWANA)
This includes people from the Middle East and North Africa (MENA region). Select all that apply.Note: “Amazigh” refers to the Indigenous people of North Africa (also called Berbers).
• White / Caucasian
Select.
Clarification:
This includes people with origins in Europe, North America (non-Hispanic), and parts of Western Asia (e.g., Armenian, Georgian — though some may be included under SWANA depending on identity).


• Gender and Sexual Orientation
This section is completely optional and designed for statistical and programmatic purposes only. The information you provide will not affect your admission chances.
- How do you describe yourself?
Choose the gender identity that best describes you.
- Additional Notes:
These options are inclusive of a wide range of gender identities.
“Nonbinary” applies if you do not exclusively identify as either male or female.
“Different Identity” can be used if none of the predefined labels fit your gender.
- What do you consider yourself to be?
This question refers to your sexual orientation. Select the one that applies.
- Additional Notes:
You may skip this section if you prefer not to disclose this information.
This data is used solely by UC for inclusivity analysis and services planning.
Once you’re done, click the Save & Continue button to move forward.

5. Your Background
This section helps the University of California better understand your home environment, potential financial needs, and eligibility for scholarships or application fee waivers. It asks about your first language, life circumstances, and military affiliation (if any).
• What language did you learn to speak first?
From the dropdown menu labeled “Language”, choose the language you first learned to speak at home.
This helps UC understand the linguistic diversity of its applicants.
- Please tell us more about yourself
Check all the boxes that apply to your personal situation:
I am married or in a civil union/registered domestic partnership
I have children
I’ve been in foster care or am a ward of the court in the United States
When I attend UC, I will be a current or former member of the U.S. military
None of the above apply to me (check this if none of the previous statements are true)
- Tip:
This question helps determine eligibility for support programs or special services, including financial aid and housing options.
• Are you a dependent of a U.S. military veteran or service member?
Select Yes if either of your parents or legal guardians currently serve or have served in the U.S. military.
Select No if this does not apply to your household.
Once all fields are completed, click the blue “Save & Continue” button to proceed to the next section.

6. Your Household
Your home address
This displays the permanent home address you previously entered in the “Contact Information” section.
It will be referenced in the upcoming questions.
Who lives with you at your permanent home address?
Select one of the following options based on who resides with you:
One Parent
Two Parents
Legal Guardian(s)
Other
Parents may be biological, adoptive, step-parents, or legal guardians.

What was the total income earned in 2024 by your parents or legal guardians?
Enter the total combined gross income your parent(s)/guardian(s) earned in 2024.
This field is used to evaluate eligibility for:
Outreach programs
Scholarships
Application fee waiver
Note: This data is not used for financial aid decisions.
How many people were supported by this income?
Enter the number of individuals (including yourself) supported by the income reported above.
Save and continue
Click the blue “Save & continue” button to move on.

7. Parent Information
This section helps UC understand your family background by collecting information about the parents or guardians you choose to report. You’re not required to list both parents, but if applicable, UC allows you to report information for more than one.
- Parent Household Overview
This section is different from the “Your Household” page.
Here, you can report multiple parents—even if they do not live in the same household.
You may choose to report one or both parents depending on your circumstances.
- Parent 1
Relationship to You
Select your relationship from the dropdown list.
Options include: Mother, Father, Stepmother, Stepfather, Legal Guardian, etc.
This helps UC understand your family structure.
Living Status
Select “Yes” if this parent is living, or “No” if not.
This will determine whether you are required to provide more information in the next steps (e.g., contact info, education background, employment).
- Parent 2 (Optional)
You may add a second parent if applicable.
This step is optional—only complete it if you want to report another parent or guardian.
Relationship to You
As with Parent 1, choose the appropriate relationship from the dropdown menu.
Living Status
Again, select “Yes” or “No” depending on whether the parent is currently living.
- Tips for This Section
The parent(s) you report here do not have to match exactly with those listed in the “Your Household” section.
You may include biological, adoptive, or legal guardians. Stepparents can also be included if relevant to your home support structure.
UC does not verify family information during application submission but may request documentation if admitted.
- Click “Save and Continue”, when you finished this section


8. Statement of Legal Residence (SLR)
This section determines whether you may qualify for in-state tuition at the University of California. Your answer here does not affect your admission chances—it only impacts your tuition classification after admission.
Purpose of This Section
The UC system uses the SLR to evaluate whether you are eligible for California resident tuition rates.
You must meet three criteria for at least 365 consecutive days prior to the start of the UC term:
Physical Presence
You and your parent(s) must be physically present in California.
If your family moved to California only for educational purposes (such as attending a UC or another school), you are not eligible for in-state tuition.
Intent to Remain
You and your parent(s) must show intent to make California your permanent home.
This includes severing ties with your previous residence state or country.
Immigration Status
You and your parent(s) must be either:
U.S. citizens or permanent residents
Or hold an eligible visa (such as an I-94)
You must have held this status continuously for at least one year.
Special Situations
If you do not meet all three criteria, you may still qualify under:
AB 540 (for eligible undocumented students)
Special Circumstances or Waivers
These cases typically require additional documentation during or after the application process.
Question Prompt
Would you like to be evaluated for California residency for tuition purposes?
Yes – If you believe you qualify for in-state tuition
No – If you know you do not qualify or prefer to be considered as a non-resident
Note: This selection is required to proceed, but it does not impact your admission decision.
Save and continue
Click the blue “Save & continue” button to move on.

Pop up: Complete Nonresident Status Confirmation
This step appears only if you select “No” to the question “Would you like to be evaluated for California residency for tuition purposes?”
You must complete the following sub-steps carefully to finalize your nonresident classification.
Select a Reason for Nonresident Status
You’ll see three radio button options:
I am an international student
My permanent home is in a state other than California
None of the above
❗ You must choose one before continuing.
For most international applicants, select “I am an international student.”
Acknowledge Residency Understanding
Check the box that reads: “By choosing the ‘No’ option, I understand that I will be classified as a nonresident for tuition purposes should I attend a UC school.”
This is mandatory. You cannot proceed without acknowledging this condition.
Review Exemption Eligibility (Special Circumstances Section)
Below, you’ll see multiple checkboxes. These exemptions may allow you to still qualify for in-state tuition even as a nonresident. Options include:
Child/spouse/partner of a UC faculty member
Lived in CA under non-parent adult care before age 19
VAWA immigration status
Dependent of a U.S. foreign service officer
And more
If none apply to you, check: “None of the above apply to me.”
Confirm Auto-Generated Responses
The system pulls data from earlier sections. You must confirm these statements are true. Each one is shown as a yes/no line item with an “Edit” button next to it in case you need to revise.
Examples:
“No, I am not a member of the United States Armed Forces on active duty.”
“No, I do not have a T or U Visa.”
Final Required Acknowledgments
At the bottom, check both required boxes:
Box 1: “I declare under penalty of perjury that the statements… are true and correct.”
Box 2:
“I understand I may be asked to submit documentation… and that completing this form doesn’t guarantee in-state classification.”
Click the Blue “Save & continue” Button
After checking all necessary boxes and confirming details, click “Save & continue” to return to the main application flow.

9. Review Section
• Overview of the Review Page
After completing all required entries in the “About You” section (including Personal Info, Household, Parent, and Statement of Legal Residence), the system will take you to a summary page.
This “Review” screen is not a form-filling page — it’s a static summary of all your inputs. This allows applicants to cross-check and edit information before proceeding to the next core section, “Campuses & Majors.”
• Review What You’ve Entered
Each of these fields is non-editable here, but a blue “Edit” button appears in the top-right of each section. Clicking this will redirect you back to the corresponding section for editing.
• What You Should Do at This Step
Carefully scan every field and ensure the data is accurate and complete.
If needed, click “Edit” beside any section to go back and make changes.
Once verified, scroll to the bottom and click the blue “Continue to ‘Campuses & majors’” button to move forward.
UC Application- UC Values

1. UC Values: Acknowledge Community Principles
• Read the University of California’s Guiding Values
This page outlines the UC system’s foundational values. Before you proceed with selecting campuses or majors, UC asks you to acknowledge their principles of community and equity. These are not legal terms but cultural commitments that apply to all admitted students.
• Key UC Community Principles Presented
The UC system values diversity of backgrounds, identities, and abilities.
Honesty and integrity in learning, teaching, and research are upheld at the highest level.
Respect for both differences and commonalities is expected across all interactions.
Acts of discrimination (based on race, ethnicity, sex, gender identity, age, ability, orientation, religion, politics, etc.) are explicitly rejected.
The community celebrates freedom of expression and encourages individuality within a respectful, civil environment.
• Required Action
At the bottom of the page, you’ll find a checkbox labeled:
“I acknowledge, value, and agree with these guiding principles.”You must check this box in order to continue your application. Without it, the “Save & continue” button remains inactive.
• What Happens Next
Once confirmed, click the blue “Save & continue” button to proceed to the next step: Term & Level selection.
• Tips
This page does not influence your admission decisions, but agreement is required for application submission.
If you need help understanding these values, consider reading UC’s Principles of Community.
2. Term & Level
• Confirm Your Planned Start Term
You will see a summary of the intended start term:
Fall Quarter/Semester 2025
This was selected during your initial account creation. You don’t need to change anything unless your entry term has changed.
• Select Your Application Level
You must indicate your academic standing when applying to UC. There are three choices:
First-year
Select this option if:You are currently in high school, or
You’ve graduated from high school but have not enrolled in a regular (non-summer) term at a college or university.
Transfer
Select this option if:You’ve graduated from high school and have enrolled in a regular (fall, winter, or spring) term at a college or university.
Other
Choose this if:You already have a bachelor’s degree (e.g., B.A., B.S.), or
You are not pursuing a UC undergraduate degree.
⚠️ Important: Most applicants coming straight from high school should choose First-year. Choosing incorrectly may delay or invalidate parts of your application.
• Required Action
After selecting your correct application level, click the blue “Save & continue” button to move on to the next step: Choose campuses.

3. Choose Campuses
• Select the UC Campuses You Want to Apply To
You’ll see a map of California with the locations of all 9 undergraduate UC campuses:
UC Berkeley
加州大学洛杉矶分校
UC San Diego
UC Santa Barbara
UC Davis
加州大学尔湾分校
UC Santa Cruz
加州大学河滨分校
UC Merced
Click on the name of each campus you’d like to include in your application.
You can apply to one campus or multiple campuses (up to all 9).
Each selected campus will be added to your list and you’ll later choose a major for each one.
• Application Fee Information
$95 per campus (or $80 per campus if you currently attend school in the U.S.).
Your total application cost will be displayed at the bottom once you select your campuses.
You’ll pay this fee during the final submission step.
💡 Tip: Applying to multiple campuses increases your chances of UC admission, but keep your budget in mind.
• Required Action
After selecting your desired campuses, click “Save & continue” to proceed to the next step: Choose majors.


4. Choose Majors
• Select a Major for Each UC Campus You Applied To
For each campus you selected in Step 3, you must now choose:
A primary major from that campus’s list.
Optionally, a second-choice major (available at some campuses).
• Understanding Major Availability
Each UC campus offers different majors. Not all campuses offer every major or second-choice options.
Some majors may be listed under broader schools/colleges (e.g., “College of Letters & Science” or “School of Engineering”).
Impacted or competitive majors (e.g., Computer Science, Business, Engineering) may:
Be more selective.
Have additional application questions (campus-dependent).
Not allow second-choice major selection.
• Exploring Majors
Use filters to search by subject area or department.
You can review major descriptions, degree types (B.A. vs. B.S.), and prerequisite guidance provided in the dropdown menus or info icons.
💡 Tip: If you’re undecided, some campuses allow you to choose “Undeclared” within a college or division. However, switching into impacted majors later may be difficult.
• Required Action
Once all selections are made, click “Save & continue” to proceed to the Campus-specific Review step.

5. Review (Campuses & Majors Section)
• Confirm All Selections Made in This Section
This page summarizes all entries in the Campuses & Majors section. Before proceeding, ensure all fields are reviewed and correct.
- 💡 Tip: Double-check that your major selections align with your academic goals and that all impacted majors have any required supplemental info completed (if applicable).
• Actions
Click “Edit” to revise any section.
Once verified, click “Continue to Academic History” to begin the next major portion of the UC Application.
UC Application- Academic History Section

Step 1: Introduction
• Purpose of This Section
The UC system wants to know your full academic history to assess your readiness for college-level coursework.
You will need to report all schools, courses, and grades from grades 7 through 12, as well as any college courses taken during high school.
• What You’ll Need
Official transcripts or academic records for all middle and high schools attended.
Information about math and language courses taken in 7th and 8th grade (if applicable).
Accurate data about high school coursework, including summer sessions and college-level classes taken while in high school.
• Tips for Completing This Section
Do not rely on memory. Always refer to official school records.
Enter grades exactly as they appear on transcripts.
Middle school courses that count toward high school graduation (like Algebra 1 or a foreign language) should be reported here.
• Action
Click Continue to proceed to entering your 7th & 8th Grade coursework.

Step 2: 7th & 8th Grade Courses
• Purpose of This Step
This step is used to report any high school-level math or language other than English courses taken in 7th or 8th grade.
These courses may count toward the “a–g” subject requirements for UC admission only if you received a grade of C or better.
• What to Report
Only report math and language courses.
Do not report other middle school coursework.
If you took these classes in 9th–12th grade, you’ll report them in a later step.
• Questions to Answer
Did you take any high school-level math courses in 7th or 8th grade?
Select “Yes” if you took courses like Algebra I, Geometry, or higher.
Did you take any language other than English courses in 7th or 8th grade?
Select “Yes” if you took courses like Spanish I, Mandarin, etc.
International school experience:
Did you attend school outside the U.S. for any part of 6th–8th grade?
Excludes summer sessions or American/DoD high schools.
• Action
Answer each of the three questions accurately.
Click “Save & continue” to move on to the High School Information step.

Step 3: Find High School
This step captures detailed information about the high school(s) you attended. You’ll be required to select the school, its curriculum, and your enrollment/graduation information.
Select Your High School Location
Question: Where did you attend high school?
Choose one of the following options:
In California
Outside California (in the U.S.)
Outside the U.S.
Indicate Specialized Curriculum (Optional)
You may check either:
Home school
Independent study
Leave both unchecked unless they apply.
Search for High School
Enter the name, city, or school code in the input field.
Click the orange Search button.
The results will populate below.
Select Your School
From the search results, click “Select” next to your school.
If your school doesn’t appear:
Make sure the location filter is correct.
Check spelling.
Use only key terms (avoid “High School” or “Academy” in search).
If homeschooled, enter the diploma-granting school.


Step 4: High School Information
Once you’ve selected your high school in the Education section of the Common App, you’ll need to provide detailed information about your academic history there. This section is critical for verifying your academic record, so take your time and make sure everything is accurate.
Basic High School Details
The following fields will auto-populate based on your high school selection:
School Name
City
School Code
💡 You can’t manually change these after selection. If something is incorrect, go back and search again.
Specialized Curriculum (Optional)
You’ll see the following checkboxes:
Career Pathway / Academy
International Baccalaureate (IB)
Magnet
Other
Only check these boxes if:
Your school officially offers the program, and
You were personally enrolled in that program.
For example, if your school offers IB but you weren’t in the IB track, leave it blank.
Dates of Attendance
You must enter both a start date and end date for when you attended this high school. Select:
Start Date: Month and Year (e.g., August 2022)
End Date: Month and Year (e.g., June 2026)
💡 Most students attending the same high school for all four years will select:
Start Date: August 2022
End Date: June 2026
If you transferred between schools or took time off, reflect that accurately.
Grades Attended at This School
You’ll be asked to specify which grade levels you completed at this school, with separate options for:
9th grade
10th grade
11th grade
12th grade
For each grade, you’ll select from:
Full academic year
Summer before the grade
Summer after the grade
💡 If you attended this school from 9th through 12th grade, simply check all four grade levels (and any relevant summer sessions).
School Grading System
You must select the grading system used by your school. Options include:
A B C D F (4.0 scale) — most common in U.S. schools
0–100 (numeric scale)
1–7 (IB scale)
Other
💡 If your transcript uses traditional letter grades (A, B, C, etc.), select the first option.
School Term System
This defines how many final grades your school issues per year for each course. Choose one of the following:
Full year – 1 final grade per course per year
Semester – 2 final grades per year (typical in most U.S. schools)
Trimester – 3 final grades per year
Quarter – 4 final grades per year
💡 If your school follows a semester schedule (Fall and Spring), select “Semester”.
Is this the school you will graduate from?
This is a required question.
Select Yes if this is your final high school — the one from which you will receive your diploma.
Select No if you will transfer or graduate from a different high school.
Diploma or Certificate to be Received
Choose from a dropdown menu:
High School Diploma (most common)
GED
Certificate of Completion
Other
Then, specify the expected date of graduation:
Month and Year you will receive the diploma (e.g., June 2026)
Final Actions
Once all the required fields are completed:
Click “Save & Continue” to save your current high school entry.
If you’ve attended multiple high schools, click “Add another high school” and repeat the process.
Once all schools have been added, click “I’ve finished adding high schools” to proceed to the next section.
✅ Pro Tip:
Make sure all information matches your transcript exactly. Any mismatch (especially dates, grade levels, or graduation info) can cause delays or verification issues later in the admissions process.


Step 5: 9th Grade Courses & Grades
This section asks you to enter all academic courses and grades you completed in the 9th grade. It also provides a system for indicating the honors level of each course.
Read UC’s Course Entry Guidelines
You should only include academic courses, such as English, math, science, social science, world languages, and college-prep electives.
Do NOT list non-academic classes like PE, sports, driver’s ed, ROTC, test prep, typing/keyboarding, or teacher assistant roles.
Confirm Your School Information
The application displays your school’s profile (previously selected in the High School Info step).
UC also provides honors codes:
AP: Advanced Placement
HL: UC-approved honors level
IB: International Baccalaureate
NH: Not honors
NO: No course this term
Expand Each Subject Area
Click to expand subject areas like:
9th History/Social Science
9th English
9th Science
9th Language Other Than English
9th Visual and Performing Arts
9th College-Prep Electives
Each section includes checkboxes with course titles. Next to each course is the Honors Type (e.g., HL, NH).
📌 Example under 9th History/Social Science:
Honors European History – HL
Honors US Government and Politics – HL
US History – NH
World History – NH
Select Your Courses
Check the box next to each course you took.
Once selected, a popup or new section will ask you to enter your final grades for each semester.
Enter Grades for Each Course
For every course selected:
Choose Semester 1 grade
Choose Semester 2 grade
If you didn’t take the course in one term, select “NO” (No course this term)
If You Don’t See Your Course
If your course is missing from the provided list:
Check the box “I don’t see my courses.”
You’ll be able to manually enter the course name, subject area, and grades.
Save & Continue
- Click “Save & Continue” after you’ve entered all courses and grades.
📌 Note on 10th, 11th, and 12th Grade Entry
The steps for entering 10th, 11th, and 12th grade courses are identical:
Select your courses for each year from provided subject areas.
Enter your final grades for each semester.
Use honors codes where applicable.
Manually add any course not listed.

Step 6: Colleges Attended While in High School
If you took any college- or university-level courses while in high school, you must report all institutions you attended, regardless of how long you attended or whether you completed the course(s). This information is required even if you believe the coursework won’t affect your admission decision.
Click “Add college” (if applicable).
- If you did not take any college courses during high school, simply click “I don’t have any colleges to add”.

If you’ve taken college-level courses — whether through dual enrollment, community college, or a prior university — you must include those details under the Academic History section of the UC Application.
You’ll be asked to complete the following:
🔹 Where did you attend college?
Select one of the three options:
In California
Outside California (in the U.S.)
Outside the U.S.
Then, use the Search for college bar to enter the name, city, or college code of the institution.
Click Search and select the correct result from the list.
🔹 When did you attend this college?
Specify both the start and end dates of your enrollment. This includes summer sessions or partial terms, if applicable.
You must select:
Start Date: Month & Year
End Date: Month & Year
💡 Even if you’re still currently attending, enter the anticipated end date.
🔹 What is this college’s term system?
Choose the option that best matches the school’s calendar system:
Semester (most common in U.S. colleges)
Quarter
Trimester
Other
This affects how courses and units will be interpreted.
🔹 What is this college’s grading system?
Select one of the following:
A B C D F (standard U.S. grading scale)
Other – if your school uses a different system (e.g., Pass/No Pass, numeric scale, etc.)
💡 Choose carefully — this affects how your GPA is calculated and how transferable courses are interpreted by UC campuses.
🔹 Final Step
Once all required fields are complete, click “Save & continue” to store your college record.
If you’ve attended more than one college, you’ll be prompted to add another and repeat the steps.
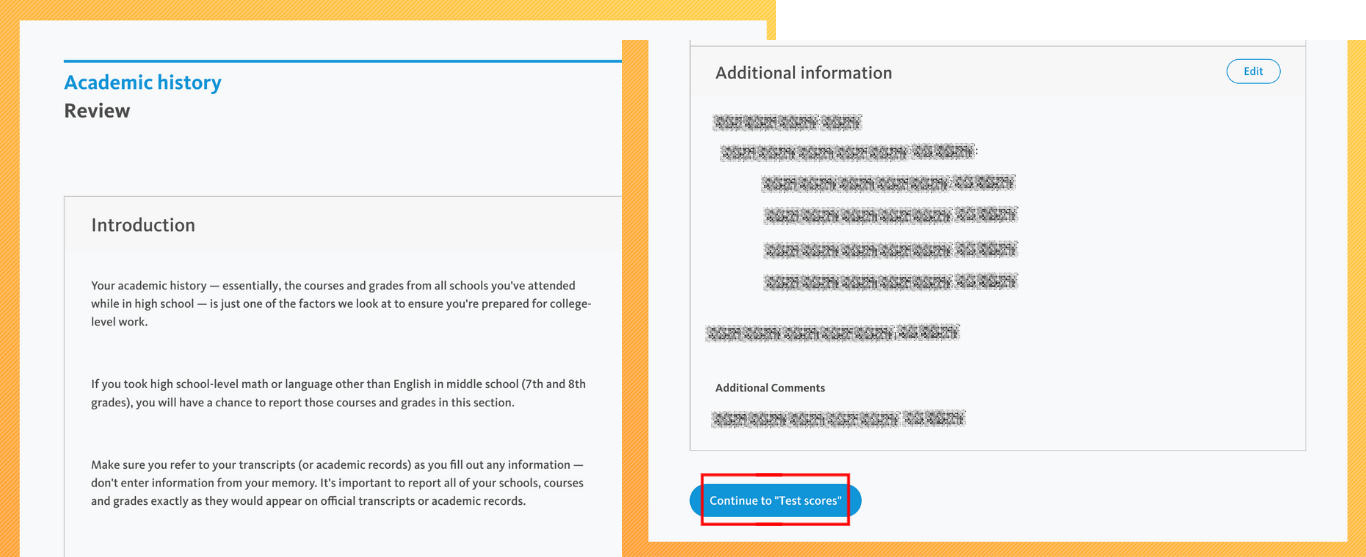
Final Review & Additional Information
This is the final review screen for the Academic History section. It includes:
Introduction Recap
A reminder to double-check that you’ve:
Reported all schools attended during high school.
Entered courses and grades exactly as shown on your official transcripts.
Included any middle school courses that count toward UC requirements (e.g., Algebra I, foreign language).
Additional Information
If you skipped entering courses for any of the high school years (e.g., 9th–12th grade), this page will list them here. You are required to confirm one of the following:
You have no courses to report, or
Go back and complete the missing course details.
Save and Continue
Click “Continue to ‘Test scores’” to begin the next section.
UC Application- Test Scores
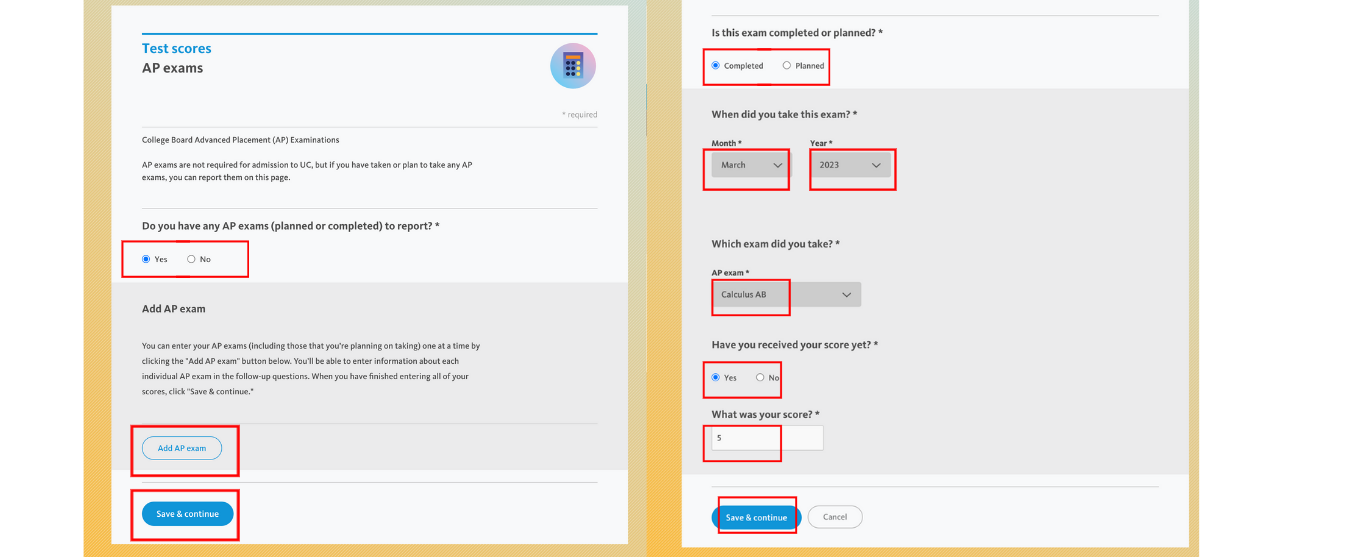
This section is optional but useful for reporting AP exams you’ve completed or plan to take. It helps the University of California understand the rigor of your coursework, even though AP scores are not required for admission.
Step 1: AP Exams
Do you have any AP exams (planned or completed) to report?
Select Yes if you have taken or will take any AP exams.
Select No if you haven’t taken or don’t plan to take any.
If you choose Yes, you’ll be prompted to add each AP exam individually.
Add AP Exam (if applicable)
Click the “Add AP exam” button to begin reporting each exam.
For each AP exam, fill out the following:
Is this exam completed or planned?
Choose either Completed or Planned.When did you take this exam?
Select the Month and Year from dropdown menus.Which exam did you take?
Choose from a list of AP subjects (e.g., Calculus AB).Have you received your score yet?
Select Yes or No.If yes, what was your score?
Enter your official score (1–5).
You may repeat this process for each AP exam by clicking Add AP exam again.
Save and Continue
Once all exams have been entered, click Save & continue to proceed to the next section.
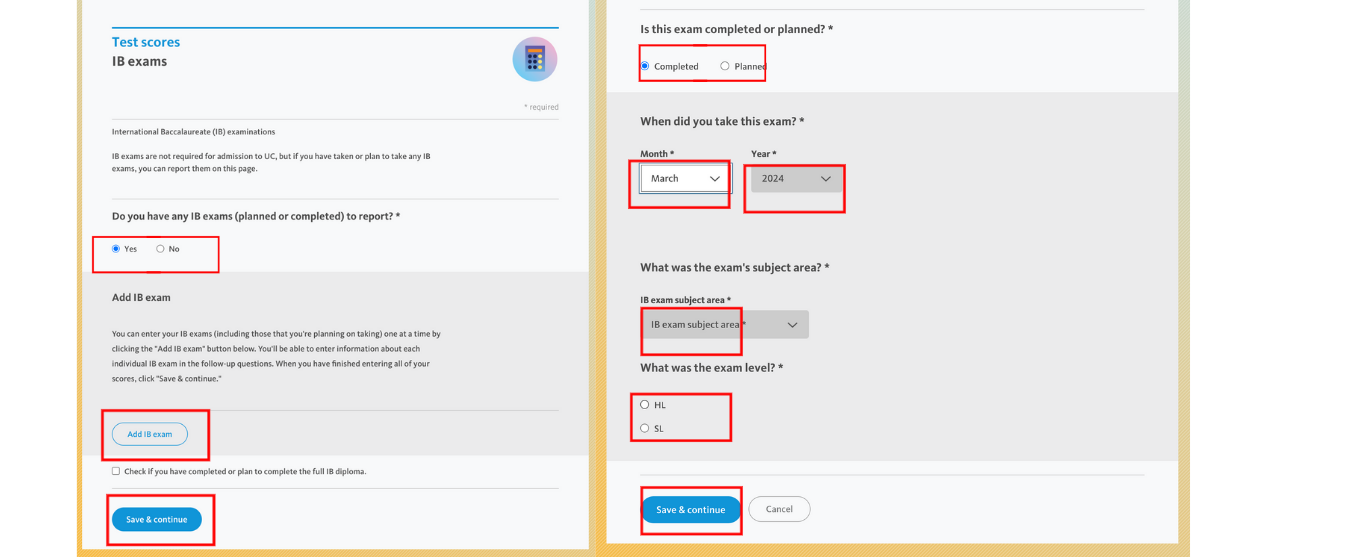
Step 2: IB Exams
If you have taken or plan to take any International Baccalaureate (IB) exams, you’ll report them in this section.
Add IB Exam
Select if you have any IB exams to report
Choose “Yes” if you have completed or plan to take any IB exams.Click “Add IB exam”
You can report each IB exam individually. Even planned exams should be listed.Complete the following fields for each IB exam:
Is this exam completed or planned?
Select either:Completed
Planned
When did you take this exam?
Use the dropdown menus to select the Month and Year (e.g., March 2024).What was the exam’s subject area?
Select from the dropdown menu of official IB subjects (e.g., Biology, History).What was the exam level?
Choose:HL (Higher Level)
SL (Standard Level)
(Optional) Check the box at the bottom if you have completed or plan to complete the full IB diploma.
Click “Save & continue” once all entries are complete.

Step 3: English Language Proficiency Tests
This section is required only for students whose language of instruction is not English in school.
Accepted exams include:
TOEFL
IELTS
DET (Duolingo English Test)
ACT English Language Arts
SAT Writing and Language
Select “Yes” for Do you have any TOEFL, IELTS, DET, ACT or SAT tests to report?
Choose your test type (e.g., TOEFL iBT), then click “Add test”
Provide the following details:
Test status: Completed or Planned
Month and Year taken
Registration number
Whether you’ve received your score
Whether you plan to retake the exam
Click “Save & continue” when done

Step 4: International Exams
This step is required for students who studied in a system where external standardized exams are common — such as:
GCSE / IGCSE / O-levels
GCE A-levels
CBSE / ICSE / Standard Board Exams (India)
Other national or regional exams
How to Complete This Step:
Select “Yes” for Do you have any international exams to report?
Choose the exam type from the dropdown (e.g., A-level, IGCSE, CBSE, etc.)
Click “Add exams”
A follow-up window will appear where you’ll:
Indicate if the exam is planned or completed
Choose Month and Year
Enter subject name
Select exam level, grade, or predicted result
Repeat this process for each subject-level exam
When all entries are added, click “Save & continue”

Step 5: Test Scores Review Page
On the review page, confirm that:
Your AP and IB exam details are correct.
English language tests (if applicable) are marked correctly.
Any international exams are either listed or noted as “None to report.”
Then click Continue to “Activities & awards” to move on.
UC Application- Activities & Awards Section

Step 1: Add Activities & Awards Overview
In this section, you’ll describe what you’re most proud of outside the classroom — including extracurriculars, volunteering, family responsibilities, hobbies, and honors.
💡 Key guidelines:
You can enter up to 20 activities or awards.
UC admissions values quality over quantity.
Choose items that reflect your long-term commitment, impact, or personal growth.
You must click “Add an activity or award” to begin.
Once you click the button, you’ll proceed to a structured form where you will:
What You’ll Be Asked (Inside Each Activity/Award Entry)
Although your screenshot doesn’t yet show the full input fields, here’s what the form usually includes:
Category (select from dropdown – e.g., Volunteer/Community, Art, Club, Work, Family Responsibilities, etc.)
Name of Organization or Program
Your Position/Role (e.g., President, Member, Volunteer)
Time Commitment (e.g., 10 hrs/week, 30 weeks/year)
Start & End Grade Levels (choose applicable years)
Brief Description (limit to 350 characters – be clear, specific, and impact-driven)
Once an entry is complete, you can save and add another, or move on.
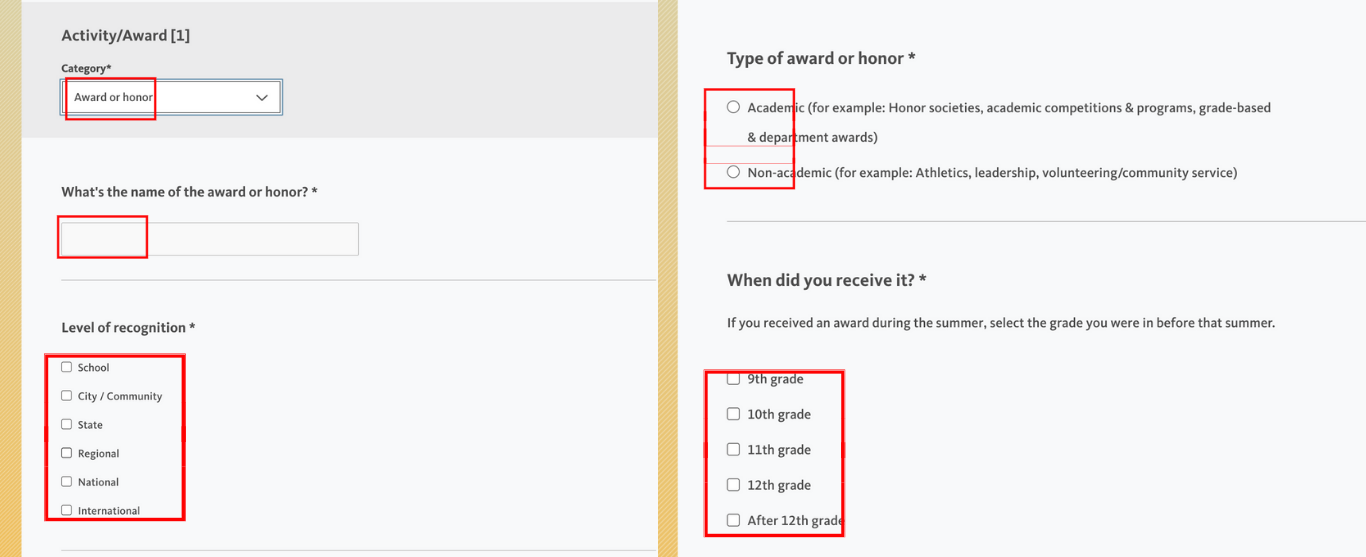
Step 2: Fill in the Activity/Award Details
Each entry requires the following information:
Category
Select either:Award or honor
Extracurricular activity
Educational preparation program
Volunteering/Community service
Work experience
Other coursework
Name of the award or activity
Input the official title (e.g., “AMC 10 Honor Roll”).Level of recognition
Check the appropriate level:School
City/Community
State
Regional
National
International
Type of award or honor (if applicable)
Choose one:Academic
Non-academic
When did you receive it?
Select the grade(s) in which this occurred:9th grade
10th grade
11th grade
12th grade
After 12th grade

Provide Short Written Descriptions
Eligibility Requirements (max 250 characters)
Briefly explain how the award was determined. For example: “Top 5% score in national exam among 15,000+ participants. Selection based on written test performance and GPA.”What You Did to Earn It (max 350 characters)
Describe your preparation or efforts. For example:“Trained weekly for 3 months, competed in 3 rounds of math contests, mentored junior students.”
Save and Add More (Optional)
After completing one activity or award, click “Save & continue”. You may then choose to add another or finish the section.
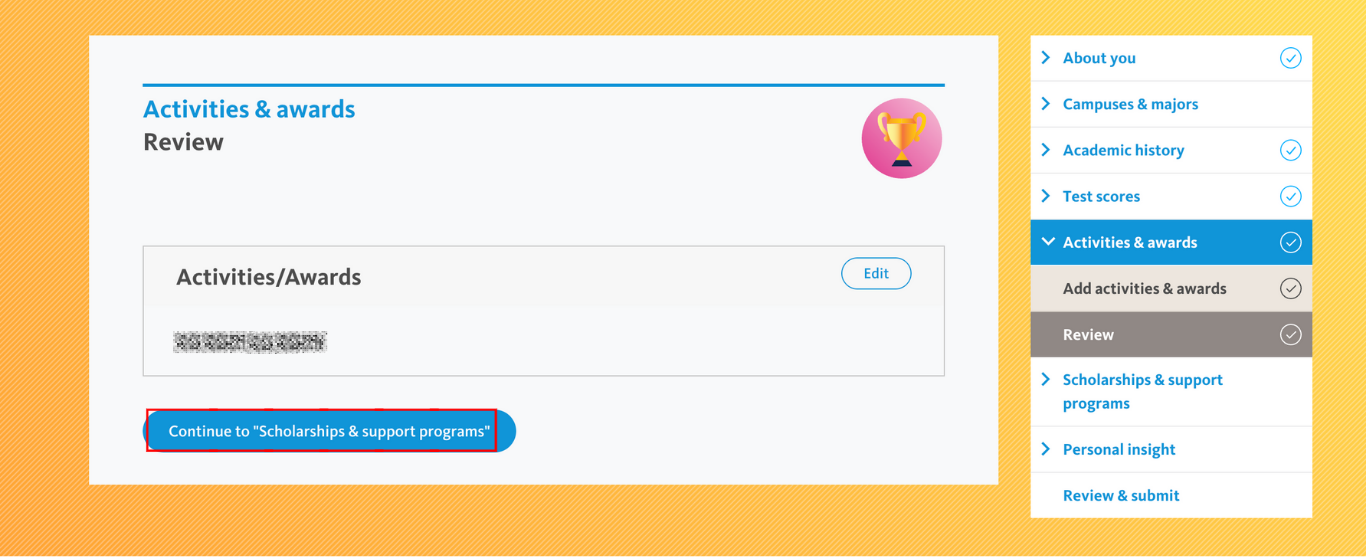
Step 3 : Confirm Entries or Make Changes
If you have not entered any activities or awards, the page will display: “No Activities reported”
If you have entered activities or awards, each will be listed with basic information, such as:
Activity/award name
Recognition level
Category (academic or non-academic)
Grade level received
Summary descriptions
Click “Edit” next to any entry if you need to revise it.
Click and Continue
Once you’re satisfied with your input, click the blue button:
- Continue to “Scholarships & support programs”
This will move you to the next section of the UC application.
UC Application - Scholarships & support programs
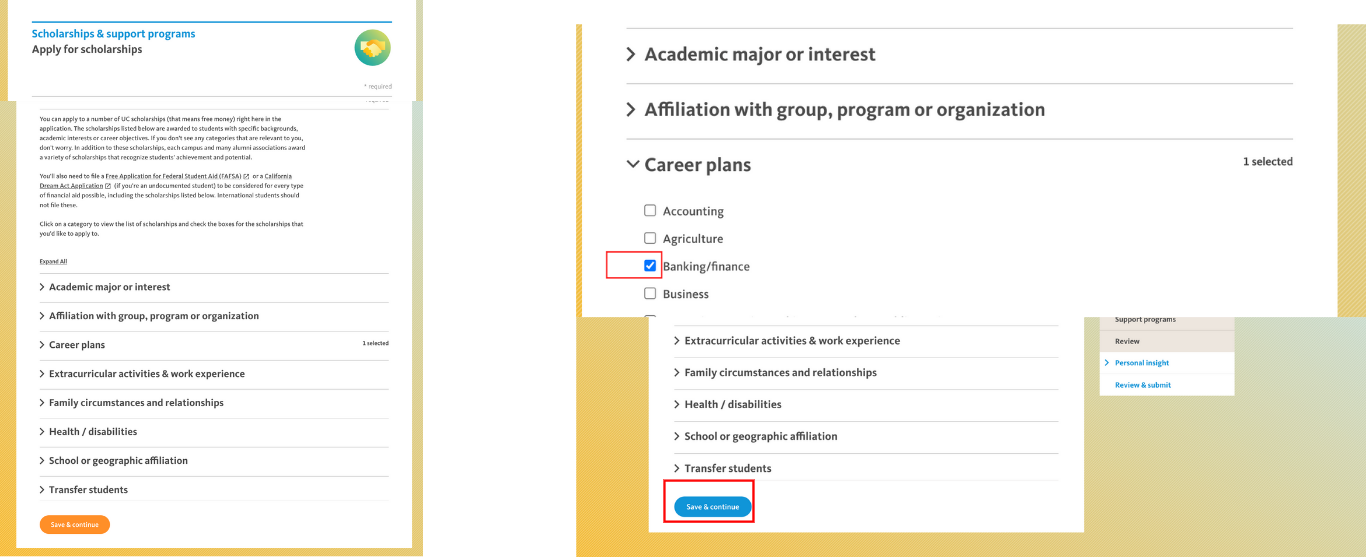
This section includes two main parts: applying for scholarships and indicating interest in campus support programs.
This section helps you apply for UC system-wide and campus-specific scholarships, and optionally indicate interest in student support programs. It is divided into two key steps:
🟦 Step 1: Apply for Scholarships
You’ll see a list of scholarship categories organized by themes such as:
Academic major or interest
Affiliation with group, program, or organization
Career plans
Extracurricular activities & work experience
Family circumstances and relationships
Health / disabilities
School or geographic affiliation
Transfer students
Each category can be expanded to show a list of specific scholarships. You can check the box next to each scholarship you’d like to apply for.
✅ Tip: You are encouraged to select as many scholarships as are relevant to your background, interests, or goals. There are no additional essays or documentation required at this stage, and selecting scholarships will not impact your admission review.
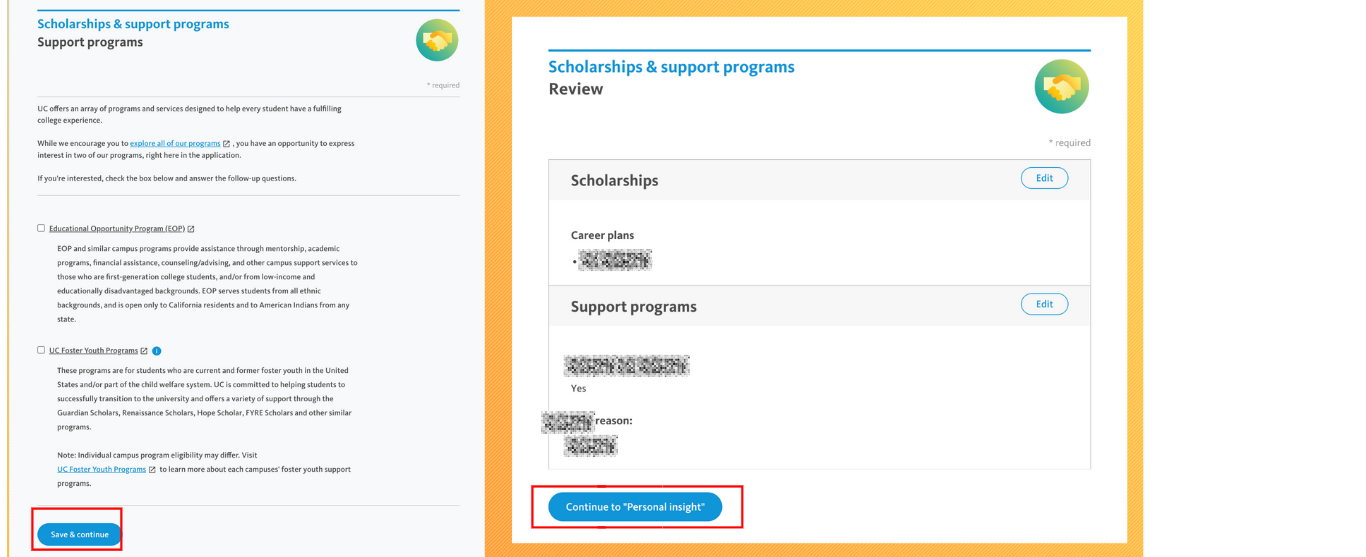
Step 2: Support Programs
UC campuses offer a variety of support services to help students from diverse backgrounds thrive in college. In this section, you can indicate your interest in specific support programs.
You’ll see two options to choose from:
1. Educational Opportunity Program (EOP)
This program provides mentorship, academic support, financial aid guidance, and campus services for students who:
Are first-generation college students
Come from low-income or educationally disadvantaged backgrounds
Belong to underrepresented groups
📝 EOP is only open to California residents and American Indian students from any state.
2. UC Foster Youth Programs
These programs support students who are:
Current or former foster youth
Part of the child welfare system in the U.S.
UC provides transition assistance and support through programs like Guardian Scholars, Renaissance Scholars, Hope Scholars, and others.
💡 Eligibility for these programs may differ by campus. A link is provided within the application to learn more.
Final Step
After selecting any support programs, click “Save & continue.”
You’ll then be shown a review page, where you can confirm your scholarship and support program selections.
Once everything looks correct, click “Continue to Personal Insight” to proceed.
UC Application - Personal Insight Questions (PIQs)
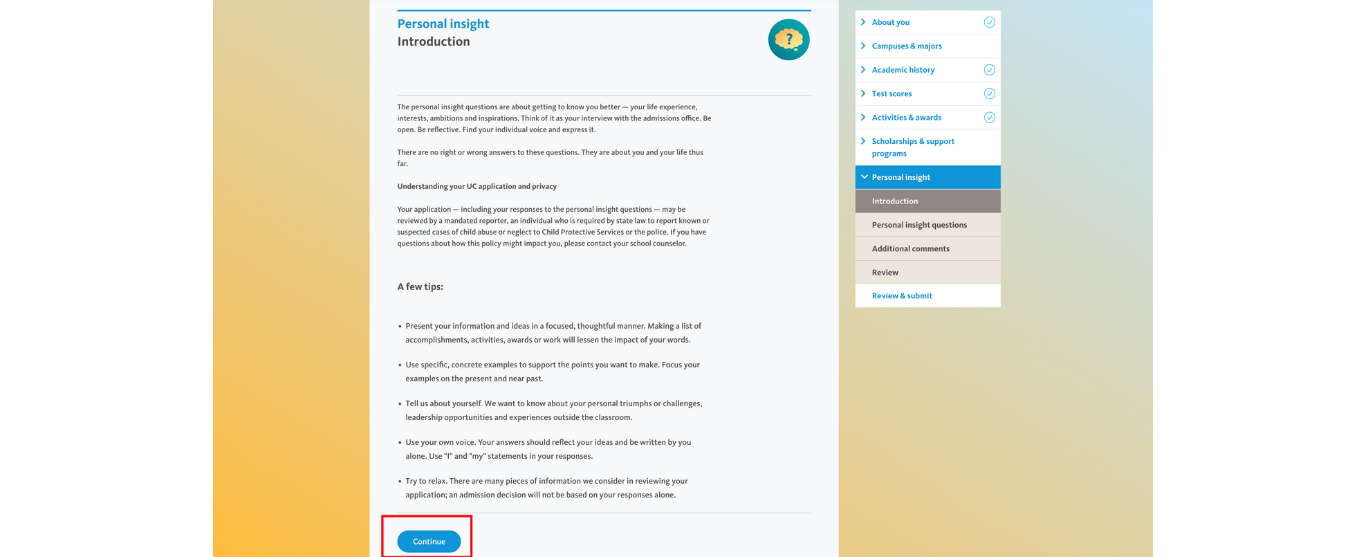
The Personal Insight Questions (PIQs) are your chance to show the UC admissions readers who you are beyond your grades and test scores. It’s like your written interview — highlighting your experiences, values, challenges, and ambitions.
Step 1: Introduction (Overview & Tips)
The page you’re viewing provides guidelines and best practices:
✅ What you should know:
These are not trick questions; they’re meant to understand your life, identity, and potential.
There is no “right” or “wrong” answer, but your responses should be honest, specific, and well thought-out.
💡 UC’s official writing tips:
Be focused and reflective, not just a list of achievements.
Use specific examples from your life, especially recent ones.
Keep the tone personal — use “I” and “my” instead of general statements.
Share experiences that show growth, insight, and initiative.
Don’t stress: UC reviews your application holistically.
Once you read the instructions, click the blue “Continue” button to begin answering.

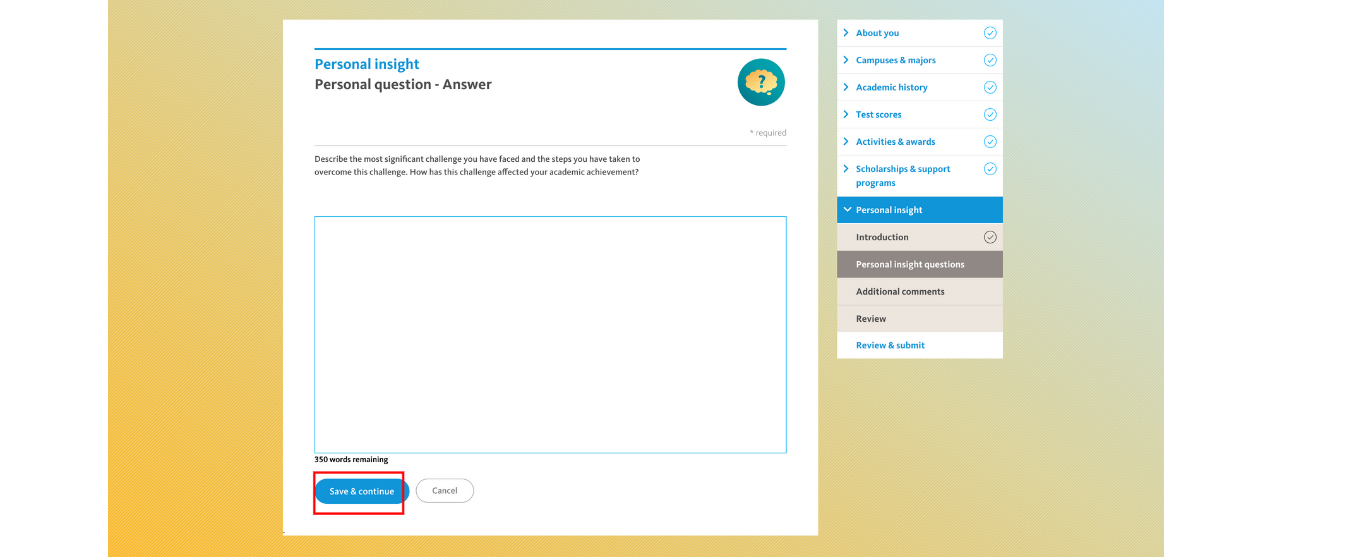
Step 2: Select and Answer 4 Personal Insight Questions
You’ll see 8 questions listed. You must pick any 4 to answer.
🔸 The 8 Personal Insight Prompts:
Leadership Experience:
Describe an example of your leadership experience in which you positively influenced others, helped resolve disputes, or contributed to group efforts.
Creative Side:
Every person has a creative side—problem-solving, artistic work, original thinking. Describe how you express your creativity.
Talent or Skill:
What would you say is your greatest talent or skill? How have you developed and demonstrated that over time?
Educational Opportunity or Barrier:
Describe how you’ve taken advantage of a significant educational opportunity or overcome an educational barrier.
Greatest Challenge:
What’s the most significant challenge you’ve faced? What did you do to overcome it, and how did it affect your academic achievement?
Academic Subject Inspiration:
Describe how an academic subject has inspired you, and how you’ve furthered this interest inside and/or outside the classroom.
Improving School or Community:
What have you done to make your school or community a better place?
What Makes You a Strong Candidate
Beyond what’s already in your application, what makes you a strong candidate for admission to the University of California?
Answering the Questions
Click Answer next to the question you wish to respond to.
You can save drafts, come back to edit, and even switch questions before final submission.
The system will display a word count as you write (250–350 words required per response).
Once you’ve selected and written responses to 4 questions, click Continue to move to the next subsection.

Additional Comments
This section is optional, and it’s not meant to be another personal insight essay. Use this space only if you need to explain something that couldn’t be included elsewhere in the application.
💡 What you can write here (examples):
Unusual personal or family circumstances that affected your academics (e.g., illness, moving homes frequently, economic hardship).
Disruptions in education (e.g., school closures, lack of AP/Honors availability).
Clarification about your transcript (e.g., a semester with dropped grades due to personal crisis).
Context for activities (e.g., if a meaningful experience wasn’t listed because of space limits).
Changes in curriculum or grading policy (especially during COVID).
🚫 What NOT to write here:
Don’t repeat content already shared in your PIQs.
Don’t treat this like an essay—be brief, direct, and factual.
Don’t use this space to promote your accomplishments or write in a self-congratulatory tone.
✍️ Word limit:
Maximum 550 words.
There is no minimum requirement.
Once completed or left blank, click “Save & continue” to move to the final Review & Submit section.
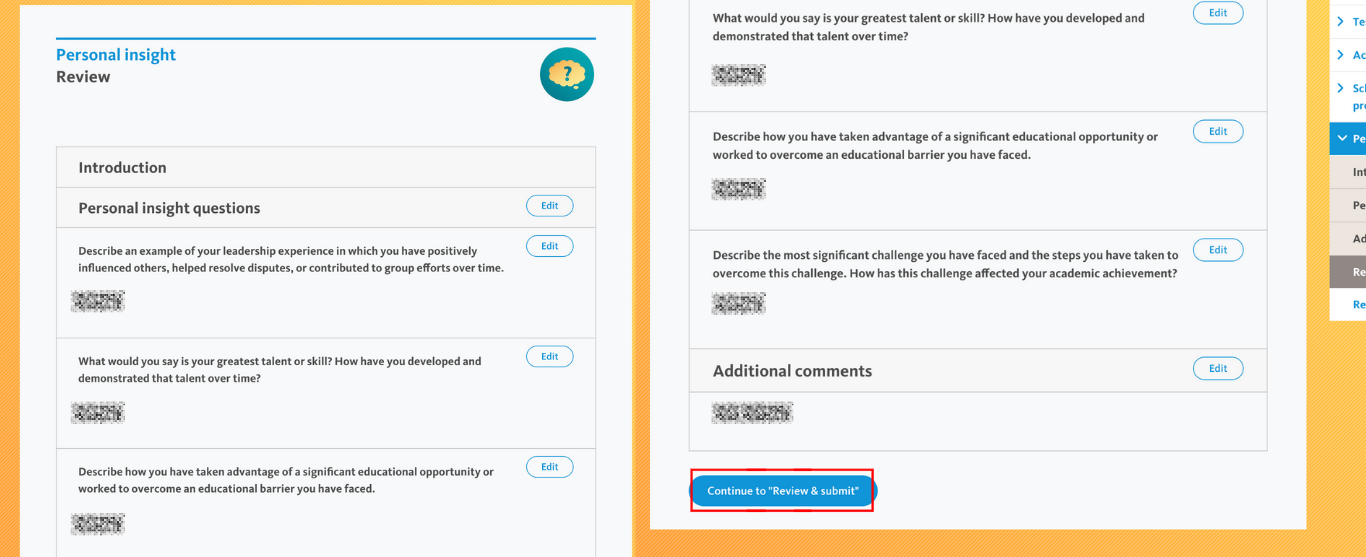
Step 3: Review
At the end of this section, you’ll see a summary of Personal Insight Prompts and your answers to those prompts.
Review everything carefully. If you need to make changes, click Edit. Once ready, click: Continue to “Final Review”.
UC Application - Final Review & Submit
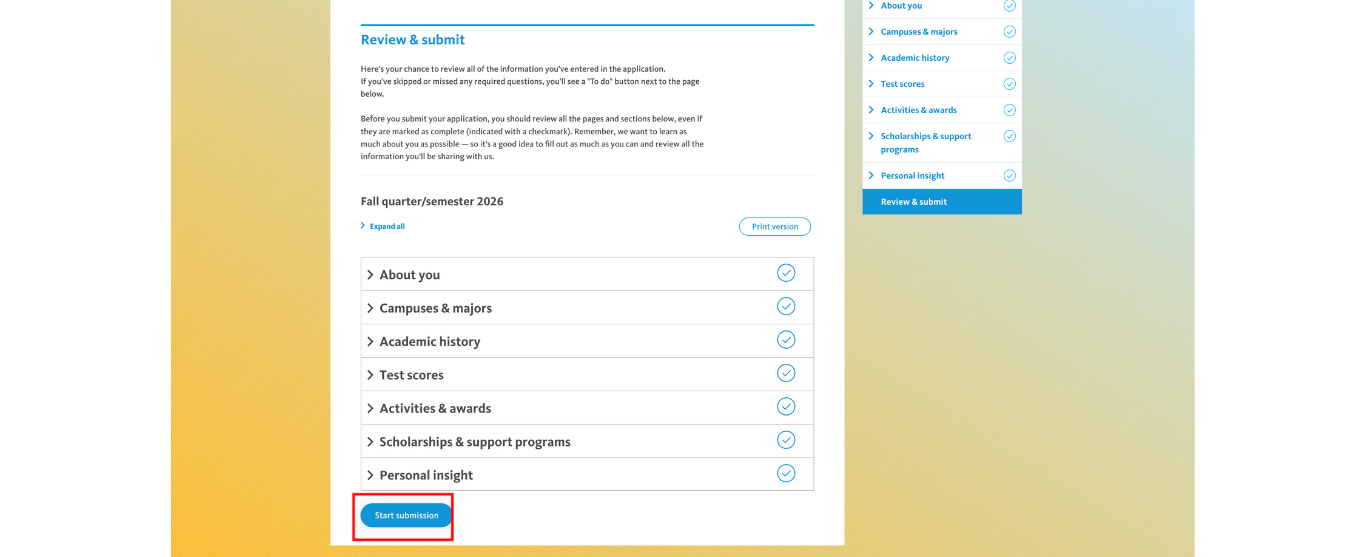
Final Confirmation Checklist
At this stage, the UC Application system gives you one last opportunity to review everything you’ve entered:
You’ll see a collapsible checklist of each major section:
About you
Campuses & majors
Academic history
Test scores
Activities & awards
Scholarships & support programs
Personal insight
Each section should show a ✔️ checkmark to indicate completion. You can click into each to re-read and verify details.
Optional: Print Version
You can click “Print version” to download a full PDF of your application for your records. This is highly recommended in case you need to reference your responses later.
Ready to Submit?
Once you’ve confirmed everything is accurate and complete:
Click “Start submission.”
Review the certification terms.
Electronically sign the application by typing your legal name.
Pay the application fee:
$80 per UC campus (U.S. students)
$95 per UC campus (international students)
If you qualified for a fee waiver, it will be automatically applied (up to 4 campuses).
Click “Submit” for each UC campus you’re applying to.
You’ll receive confirmation emails and can access your submission status through the University of California Application portal.
Need Help with Your University of California Application?
Try IvyMax’s 大学申请辅导
Applying to UC schools like UCLA or UC Berkeley?
Our College Application Program makes your UC journey easier, more affordable—and more successful.
✅ Why IvyMax?
One University of California Application = One School Credit
Whether you’re applying to 1 UC campus or all 9, we only count it as ONE school in your IvyMax program plan.
(Yes, that includes UCLA, UC Berkeley, UC San Diego, etc.)42% UC Berkeley Admission Rate
Our students have consistently outperformed the average. In the most recent cycle, 42% of IvyMax students were accepted to UC Berkeley—one of the highest success rates in the country.One-on-One Mentorship
Our expert counselors and editors help you brainstorm, structure, and polish your PIQ essays, while ensuring the rest of your application stands out.Complete Strategy from A to Z
From major selection to activity listing to essay tone, IvyMax guides you step-by-step for the entire UC system.
提交表单即代表您同意接收 IvyMax 的最新资讯和课程信息。您可以随时通过邮件底部的 SafeUnsubscribe® 链接取消订阅。
对我们的项目感兴趣?
请填写表单,我们会尽快回复您,并提供详细信息,解答您的问题!

